
Table of Contents
Your budget is ₹50,000. Your crew is three people. Your shoot window is five days. Yet somehow, you need to create a mini-series or short film that looks like it cost ten times more and took a month to shoot.
Impossible? Not anymore.
The democratization of filmmaking technology in 2026 means that cinematic quality is no longer exclusively correlated with budget size. Films shot entirely on smartphones have premiered at Sundance. Web series produced for under $100,000 have been acquired by major streaming platforms. Short films created in a week have won international festival awards.
Top Cybertize Offerings
Our comprehensive Media & Tech Services in India offerings include:
| Service Category | Specific Services |
|---|---|
| Film Production | Film, Web Series, Short films, Cinematic Films, IG Reels, Ad Films |
| Animation Production | 2D animation, 3D animation, Walkthrough, Medical Animation, Explainer Videos |
| Software Development | CMS (Content Management Softwares), On Demand Software, Edtech, SaaS Portals, ERPs, Cloud Infra, AWS, Azure |
| SEO & Content Marketing | Blog writing, video production, infographics, email marketing, white papers, case studies, On Page SEO, Link Building |
| Web Development | Website design, responsive development, e-commerce, CMS implementation, site optimization |
| AI / ML | Artificial Intelligence / Machine Learning |
But here’s what the success stories don’t always reveal: technical accessibility doesn’t automatically translate to professional results. The gap between amateur and cinematic isn’t equipment—it’s technique. The filmmakers achieving cinema-quality results on micro-budgets aren’t lucky; they’re strategic. They understand which cinematic techniques deliver maximum visual impact with minimum resource investment.
At Cybertize Media Productions Private Limited, we’ve produced numerous budget-conscious projects that punch far above their financial weight. After analyzing what separates projects that “look cheap” from those that “look indie,” we’ve identified the core cinematography techniques that transform limited-budget productions into professional-quality content.
This comprehensive guide reveals the cinematographic strategies that matter most when resources are constrained—from lighting approaches that cost nothing but deliver stunning results, to framing techniques that create production value through composition rather than equipment, to workflow optimizations that maximize limited shoot time.
Whether you’re producing your first short film, launching a web series, or creating a mini-series pilot, these techniques will help you achieve cinematic results regardless of budget limitations.
The Budget Filmmaker’s Mindset: Constraints as Creative Advantage
Before diving into specific techniques, understanding the psychological reframe that separates successful budget filmmakers from struggling ones is essential.
Embrace Limitations, Don’t Apologize for Them
Every constraint—limited budget, small crew, tight timeline—forces creative problem-solving that often produces more distinctive work than unlimited resources would.
The Limitation Paradox: Films like Tangerine (shot entirely on iPhone 5S) and Paranormal Activity (budget: $15,000, box office: $193 million) didn’t succeed despite their limitations—they succeeded partly because of them. Constraints forced filmmakers to develop unique visual strategies that became their creative signatures.
When you have:
- No lighting budget → You master natural light and discover beauty in darkness
- No crew for complex moves → You develop powerful static framing and intentional minimalism
- No time for extensive setups → You become efficient with blocking and maximize every location
At Cybertize Media, we approach every budget project with a simple philosophy: What can we do exceptionally well with available resources? rather than What can’t we afford to do?
Study Cinema, Not Just Budget Filmmaking
A common mistake: budget filmmakers only study other budget films, unconsciously absorbing their compromises and limitations rather than learning from cinema’s masters.
The Better Approach: Study films by Roger Deakins, Emmanuel Lubezki, Bradford Young, and other master cinematographers. Then reverse-engineer how to achieve similar emotional impact with budget tools.
For example:
- Deakins’ use of negative space → Costs nothing, creates stunning minimalist compositions
- Lubezki’s natural light mastery → Requires no gear, just understanding and timing
- Young’s embrace of darkness → Reduces lighting needs while creating mood
The goal isn’t replicating their exact techniques—it’s understanding the principles behind them and adapting those principles to your constraints.
Plan Obsessively, Shoot Efficiently
Budget filmmaking demands preparation that would seem excessive on well-funded productions:
Pre-Production Investment Pays Off:
- 1 hour of location scouting saves 3 hours of problem-solving on set
- 1 hour of shot-listing prevents 5 hours of coverage shooting
- 1 hour of lighting rehearsal eliminates 4 hours of adjustment
- 1 hour of actor blocking saves 2 hours of setup between takes
With limited shoot time, every unplanned minute is enormously expensive. The filmmakers who succeed on tight budgets treat pre-production planning as their primary investment.
Technique 1: Mastering Natural Light—The Ultimate Free Lighting Package
Natural light is simultaneously the most accessible and most challenging light source in cinematography. It’s free, infinitely powerful, and constantly changing—which makes it both opportunity and obstacle.
Understanding Natural Light’s Character
Natural light isn’t one thing—it’s a spectrum of qualities that change throughout the day and in different weather conditions:
Golden Hour (sunrise/sunset):
- Quality: Warm, soft, diffused
- Direction: Low angle, wraparound
- Best for: Romantic scenes, nostalgic moods, flattering portraits
- Challenge: Only 30-60 minutes of optimal light
- Strategy: Schedule tightly, shoot most important shots first
Blue Hour (twilight):
- Quality: Cool, even, mysterious
- Direction: Ambient, non-directional
- Best for: Night scenes without needing artificial light, moody atmospheres
- Challenge: Even shorter window than golden hour
- Strategy: Use higher ISO, wider apertures, embrace grain
Midday Sun:
- Quality: Harsh, high-contrast, unflattering
- Direction: Overhead, creating shadows in eye sockets and under nose/chin
- Best for: Actually very little—this is typically “bad” light
- Challenge: Hard shadows, squinting actors, overexposure
- Strategy: Avoid when possible; if unavoidable, use open shade or diffusion
Overcast Days:
- Quality: Soft, even, low-contrast
- Direction: Wraps around subjects from all angles
- Best for: Dialogue scenes, close-ups, consistent lighting across long shoots
- Challenge: Can look flat without creative intervention
- Strategy: Add depth through composition, blocking, and subtle reflectors
Open Shade:
- Quality: Soft, directional from sky
- Direction: From above and sides (depending on shade structure)
- Best for: Portraits, interviews, any scene requiring flattering light
- Challenge: Can be too blue, needs color correction
- Strategy: Place subjects at edge of shade where light wraps nicely
Working With Windows: Interior Natural Light
Windows are your most valuable lighting tool for interior scenes on budget productions. Understanding how to exploit them separates amateur from professional results.
The 90-Degree Rule: Position your subject approximately 90 degrees from the window (perpendicular), not facing it directly or with back to it. This creates:
- Dimensional modeling of facial features
- Natural falloff from light to shadow
- Separation from background
- Professional three-dimensional look
Never Shoot Toward Windows (Unless Intentionally Creating Silhouettes): Shooting toward bright windows causes:
- Blown-out backgrounds with no detail
- Underexposed foregrounds
- Muddy, unappealing contrast
- Amateur aesthetic
The Negative Fill Technique: Even with beautiful window light, you can enhance dimension by adding shadows. Place dark fabric (black curtains, blankets, or foam board) on the opposite side from the window to prevent light from bouncing back and filling shadows. This costs nothing and dramatically improves image quality.
Controlling Window Light Intensity: Too much light? Solutions that cost nothing:
- Sheer curtains as diffusion
- Sheets taped to windows
- Repositioning subjects farther from window
- Scheduling shoots for different times of day
Not enough light? Free amplification:
- White bed sheets or foam board as reflectors
- Position subject closer to window
- White walls naturally bounce light
- Remove dark furniture/objects that absorb light
The Sun Path Strategy
Amateur filmmakers are victims of the sun; professionals plan around it.
Essential Pre-Production Tool: Apps like Sun Seeker, Helios Pro, or Photopills show exactly where the sun will be at any time on any date. Use these to:
- Scout locations at actual shoot times: Never scout during different hours than you’ll shoot
- Identify optimal windows: Determine when light will be best for each scene
- Plan shot order: Schedule based on sun position, not script order
- Anticipate problems: Know when direct sun will create issues
- Identify backup plans: Understand what happens if weather changes
Real Example: Planning a five-day shoot with natural light only, we used sun path planning to:
- Schedule exterior dialogue scenes during golden hour
- Save interior scenes for midday when exterior light was harsh
- Plan establishing shots during blue hour
- Build in weather backup options
- Know exactly where to position actors for optimal light
Result: Shot 30 scenes across 12 locations with zero artificial lighting, achieving consistent cinematic quality by planning around natural light rather than fighting it.
Embracing Darkness: Low-Light Cinematography
One of the most powerful budget techniques is allowing scenes to be dark. Consumer expectations have been trained to expect every frame perfectly lit—but cinematic work often thrives in darkness.
The Psychology of Darkness:
- Selective visibility creates mystery and engagement
- Shadows add dimension and drama
- Darkness focuses attention on what is lit
- Low-light creates intimacy and emotional intensity
Technical Approach to Darkness:
- Expose for Highlights, Let Shadows Go Black: Don’t try to light everything; light what matters and let the rest fall into shadow. A face illuminated against darkness is more powerful than a fully lit scene.
- Use Modern Camera Technology: 2026 cameras (even budget models) handle high ISO remarkably well. Embrace the capability:
- Shoot at ISO 3200-6400 without fear
- Accept slight grain as texture, not flaw
- Understand that slight noise is preferable to flat, over-lit scenes
- Silhouettes Are Your Friend: Backlit figures against bright backgrounds create powerful images with no additional lighting required.
- Single Source Lighting: One light source (window, doorway, practical lamp) can create dramatically beautiful scenes. Don’t feel obligated to fill every shadow.
Films That Prove Darkness Works:
- Tree of Life – Terrence Malick
- The Revenant – Emmanuel Lubezki
- Barry Lyndon – Stanley Kubrick (candlelit scenes)
- Only God Forgives – Larry Smith
All used darkness strategically, proving that “well-lit” doesn’t mean “everything is visible.”
Technique 2: Framing as Production Value—Composition Over Equipment
When you can’t afford expensive production design, elaborate sets, or extensive location work, composition becomes your production value. The way you frame the world transforms reality into cinema.
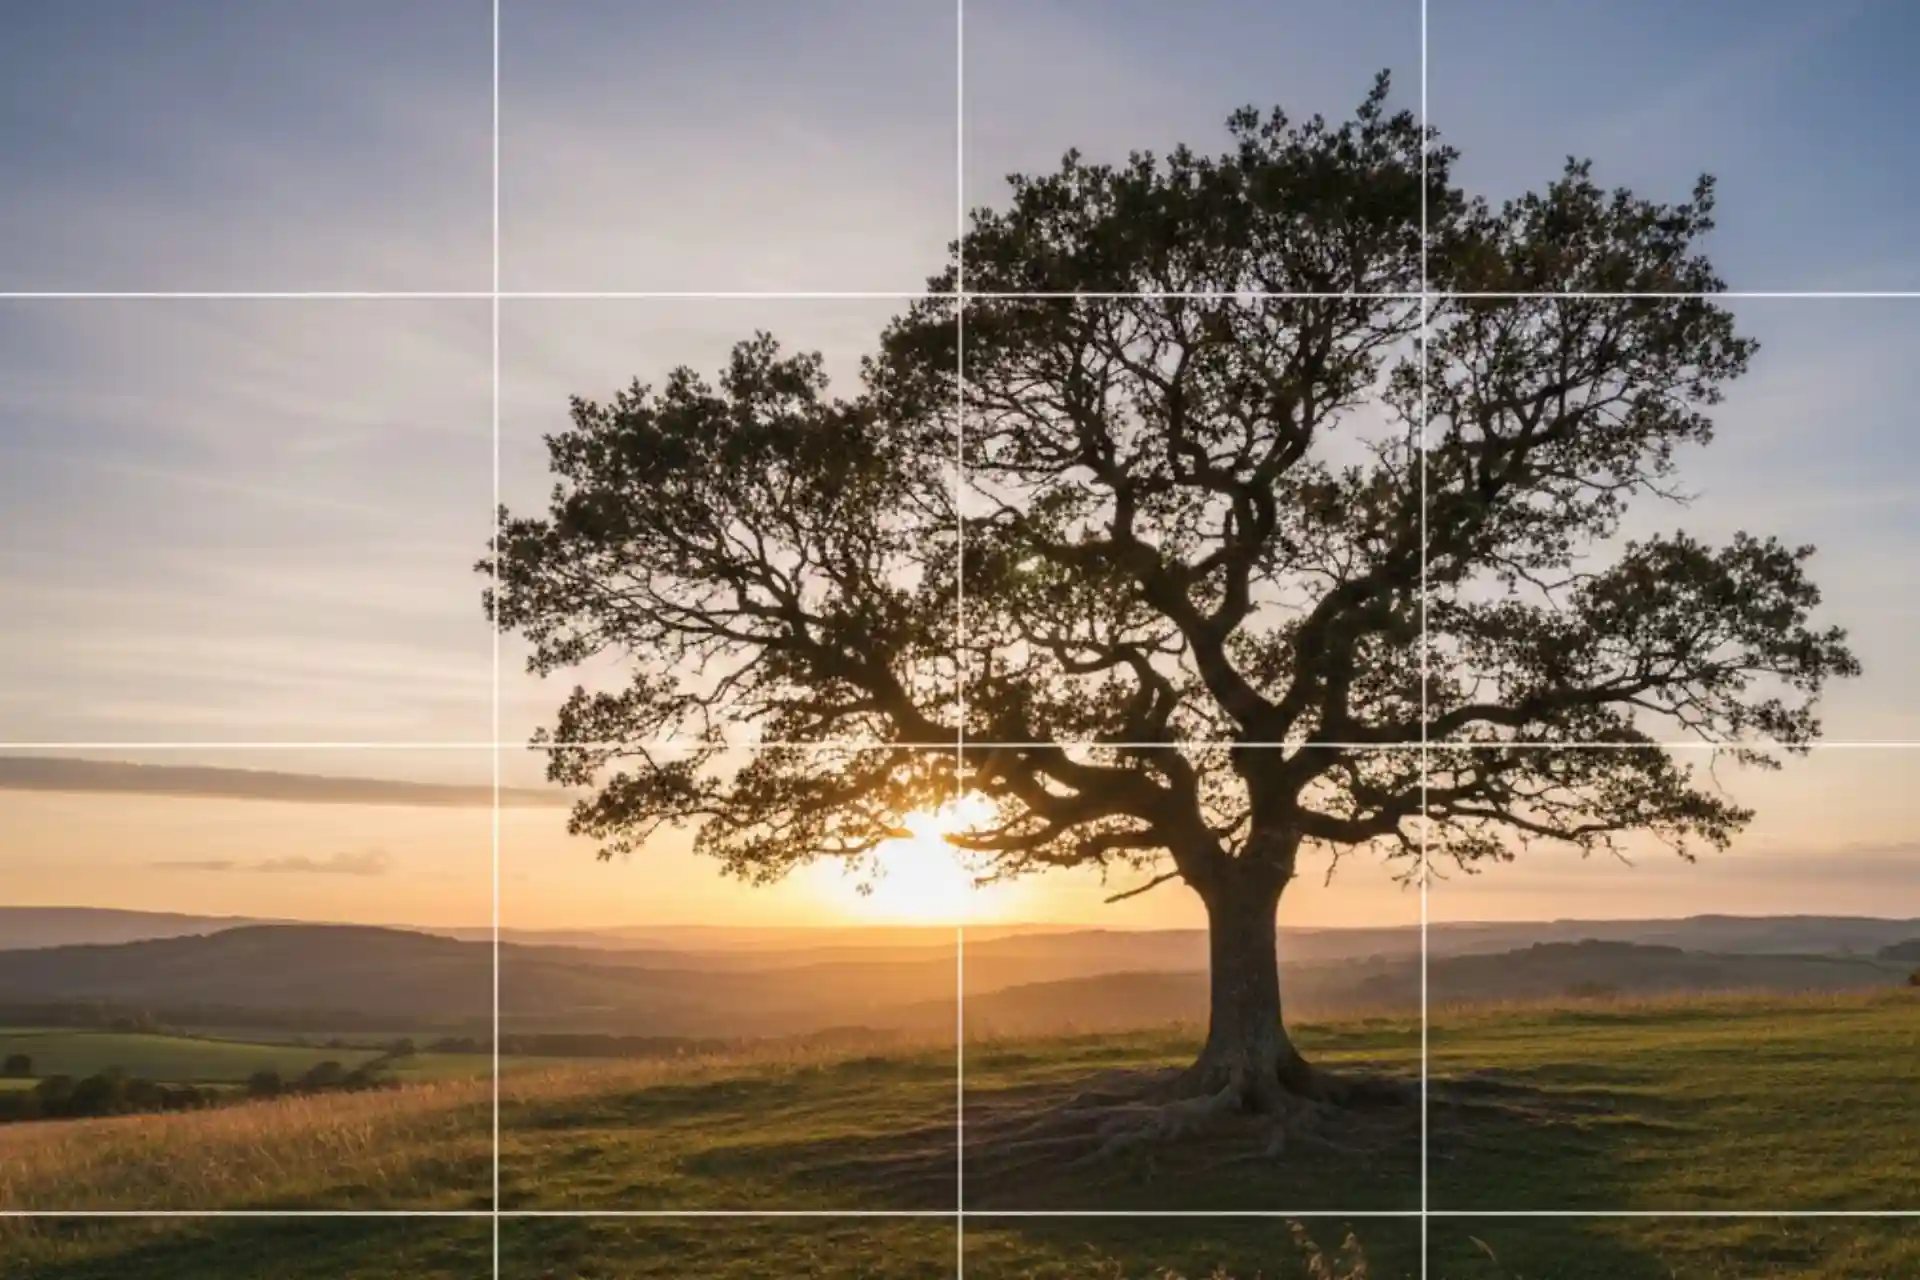
The Rule of Thirds and Breaking It Intentionally
Every filmmaker learns the rule of thirds: divide the frame into nine equal parts and place subjects along the lines or at intersections. This works—but it’s just the beginning.
When to Use Rule of Thirds:
- Establishing shots and wide compositions
- Scenes emphasizing environment and context
- Multiple subjects requiring balanced composition
- Natural, documentary-style realism
When to Break It:
- Center-framing for symmetry and formalism (Wes Anderson style)
- Extreme off-center placement for discomfort or isolation
- Top-heavy framing to show space above character
- Bottom-heavy framing to show weight or oppression
The Key: Make intentional choices. Rule of thirds is safe; breaking it creates distinctive style—but only if done purposefully.
Negative Space as Storytelling Tool
Empty space in frame isn’t wasted space—it’s powerful visual communication.
Strategic Negative Space Communicates:
- Isolation: Subject small in frame, surrounded by empty space
- Direction: Empty space in front of subject suggests forward movement
- Contemplation: Space allows viewer to absorb mood
- Minimalism: Less visual information focuses attention
- Scale: Space emphasizes environment’s vastness
Budget Advantage: Negative space actually reduces production design requirements. You need less “stuff” in frame when you’re using empty space as visual element.
Example Approach: Instead of spending money on elaborate set dressing, frame characters against empty walls with dramatic use of negative space. Result: distinctive minimalist aesthetic that looks intentional rather than budget-constrained.
Depth Through Foreground Elements
Amateur cinematography often feels flat because everything is in the middle of the frame. Professional work creates depth by using multiple planes:
The Three-Plane Approach:
- Foreground: Closest to camera (slightly out of focus)
- Middle Ground: Main action (in focus)
- Background: Far from camera (often out of focus)
Budget-Friendly Foreground Elements:
- Door frames (shoot through doorways)
- Window frames
- Hanging plants or branches
- Furniture edges
- People’s shoulders if shooting past them
- Architectural elements
- Natural elements (leaves, grass, etc.)
Why It Works: Multiple planes create sense of three-dimensional space from two-dimensional image, adding sophistication without costing anything.
The Power of Static Frames
Budget films often overuse camera movement trying to create “production value.” But some of cinema’s most powerful images are completely static.
When Static Frames Excel:
- Contemplative Moments: Stillness allows emotional absorption
- Symmetrical Composition: Movement would break formal balance
- Observational Style: Documentary-like objectivity
- Theatrical Framing: Stage-like presentation of action
- Limited Equipment: No dolly/gimbal needed
Directors Who Prove Static Works:
- Yasujirō Ozu (master of still frames)
- Roy Andersson (meticulously composed static shots)
- Wes Anderson (symmetrical static compositions)
- Kelly Reichardt (minimalist stillness)
Budget Benefit: Static frames require only a tripod—the most affordable support system. They also simplify actor blocking and reduce setup time.
Motivated Movement vs. Arbitrary Motion
When you do move the camera, ensure movement is motivated—driven by narrative or emotional purpose, not just technical capability.
Motivated Movement Examples:
- Following Action: Camera tracks character walking
- Revealing Information: Slow push-in to emphasize detail
- POV Shift: Pan to show what character sees
- Tension Building: Slow dolly creating unease
- Energy Amplification: Handheld adding chaos
Arbitrary Movement (avoid):
- Constant unmotivated drift
- Showing off gimbal capabilities
- Movement because you’re bored with static
- Random pans and tilts
- Shaky cam without purpose
Budget Reality: Most motivated movement can be achieved with tripod pans/tilts and simple slider moves. You don’t need Steadicam or elaborate dolly systems.
Aspect Ratio as Style Choice
Aspect ratio—the shape of your frame—dramatically impacts viewer perception and is completely free to control in-camera or post.
Common Aspect Ratios:
16:9 (1.78:1) – Standard widescreen:
- Feel: Modern, natural, accessible
- Best for: Contemporary stories, web content
- Budget advantage: Native to most cameras
2.39:1 – Cinematic widescreen:
- Feel: Epic, cinematic, letterboxed
- Best for: Grand narratives, scope, drama
- Budget advantage: Can letterbox 16:9 in post
- Note: Loses resolution when cropping
4:3 (1.33:1) – Academy ratio:
- Feel: Vintage, intimate, claustrophobic
- Best for: Period pieces, psychological stories
- Budget advantage: Distinctive without costing anything
- Growing trend in indie/art cinema
1:1 – Square:
- Feel: Social media, modern, contained
- Best for: Instagram-native content, intimate stories
- Budget advantage: Works perfectly for vertical viewing
Strategic Choice: Aspect ratio is pure artistic decision—costs nothing but significantly impacts viewer experience. Choose based on story needs, not default settings.
Technique 3: Practical Lights as Production Design and Lighting
Practical lights are light sources that appear in frame—lamps, candles, string lights, neon signs, screens. They serve dual purpose: production design element and actual lighting source.
Why Practicals Matter for Budget Productions
Practicals solve multiple problems simultaneously:
- Lighting Source: They actually illuminate the scene
- Production Design: They dress the set
- Motivated Lighting: Justify where light comes from
- Atmosphere: Create mood through color and quality
- Budget-Friendly: Often cheaper than rigging film lights
The Stanley Kubrick Approach: Barry Lyndon famously lit period scenes using only candlelight (with special ultra-fast lenses). While you probably don’t have Kubrick’s budget for special lenses, the principle remains: practical sources can provide all necessary light.
Choosing the Right Practicals
Not all practical lights work cinematically. Here’s what to look for:
Warm Tungsten Bulbs (2700K-3200K):
- Create pleasing, cinematic warm tones
- Flattering to skin tones
- Feel intimate and comfortable
- Available cheaply at any hardware store
Avoid: Cool LED bulbs (5000K+) which feel clinical and unflattering unless that’s your intentional aesthetic.
Dimmable Practicals:
- Must be able to control intensity
- Prevents overexposure
- Allows matching exposure across multiple practicals
- Simple dimmer switches cost ₹200-500
Interesting Shapes:
- String lights create magical backgrounds
- Edison bulbs have beautiful filament glow
- Paper lanterns diffuse softly
- Colored bulbs add stylistic flair
The Single Practical Technique
One well-placed practical can light an entire scene beautifully:
Example Setup:
- Single table lamp with warm bulb
- Position 45-90 degrees from subject
- Use dimmer to control intensity
- Let shadows fall naturally
- Don’t attempt to fill every dark area
Result: Intimate, naturalistic, cinematic scene with single ₹500 lamp as only light source.
Real Application: We’ve shot entire short films using only practical lights, saving tens of thousands on lighting rental while achieving warm, atmospheric results impossible with conventional film lights on similar budget.
Screens as Practical Light Sources
Laptops, phones, tablets, and TVs are practical lights you already have:
Screen Light Characteristics:
- Flickering quality adds energy
- Blue-toned creates specific mood
- Motivated source (character is realistically using device)
- Completely free
Creative Applications:
- Character illuminated by laptop in dark room
- Phone glow on face during nighttime scene
- TV light creating atmosphere
- Multiple screens for multi-colored light
Pro Tip: Load a solid color or video clip on screen to control color and intensity. White screens provide maximum light; colored screens create stylistic choices.
Technique 4: Camera Movement on a Budget—Getting Cinematic Motion Without Expensive Gear
Camera movement adds energy and production value, but professional motion control systems cost tens of thousands to rent. Here’s how to achieve cinematic movement without the budget.
The Tripod Pan/Tilt—Underrated and Powerful
Simple pans and tilts on a basic tripod create surprisingly effective camera movement:
Slow Push Effect:
- Use tripod zoom (if available) or digital punch-in post
- Very slow, subtle movement toward subject
- Creates tension and draws attention
- Requires only tripod, no special equipment
Reveal Pans:
- Start on one subject, slowly pan to reveal another
- Classic technique for surprise or comparison
- Smooth fluid head (₹3,000-10,000) makes this professional
Following Action:
- Pan to follow character movement
- Keeps subject in frame during action
- More dynamic than static wide shot
Key to Success: Movement must be very smooth. Invest in decent fluid head (₹5,000-15,000) rather than cheap friction head. This is the most important tripod purchase for budget cinematography.
DIY Slider Techniques
Professional sliders cost ₹20,000-₹1,00,000+. DIY solutions cost under ₹5,000:
PVC Pipe Slider:
- Materials: PVC pipe, skateboard wheels, plywood
- Cost: ₹2,000-3,000
- Result: 2-3 foot tracking shots
- Tutorials: Widely available on YouTube
Wheelchair Dolly:
- Actual wheelchair with tripod mounted on seat
- Smooth surfaces only
- Cost: Borrow or rent for ₹500/day
- Range: Longer moves than slider
Wheeled Office Chair:
- Operator sits in chair holding camera
- Assistant pushes smoothly
- Costs nothing (use existing chair)
- Works surprisingly well on smooth floors
Shopping Cart:
- Camera operator sits in cart
- Smooth pushing on flat surfaces
- Free if you have access to cart
- Better than nothing for tracking shots
The Reality: These DIY solutions won’t match $50,000 dolly smoothness, but they’re 80% of the way there at 1% of the cost. Combined with post-stabilization, results can be remarkably professional.
Handheld for Purpose, Not Default
Handheld camera work is free (requires no support equipment) but often overused by budget filmmakers who assume movement equals production value.
When Handheld Works:
- Documentary Style: Realism and immediacy
- POV Shots: Character’s perspective
- Chaos and Energy: Action, stress, urgency
- Guerrilla Shooting: Fast, run-and-gun situations
- Intimate Following: Moving with character through space
When Handheld Fails:
- Contemplative, slow scenes (creates wrong energy)
- Formal, controlled narratives (breaks aesthetic)
- Extended dialogue (shake becomes distracting)
- Beautiful landscapes (movement competes with view)
Technique for Better Handheld:
- Proper handheld technique (elbows in, camera to body)
- Shorter focal lengths (wider lenses more stable)
- Modern IBIS (in-body image stabilization) helps significantly
- Post-stabilization in editing (DaVinci Resolve, Premiere)
- Deliberate movement, not random shake
The Whip Pan—Free Energy
One of the most effective and completely free camera moves:
What It Is: Extremely fast pan between two subjects or locations, blurring everything in between.
Why It Works:
- Creates energy and pace
- Connects separate locations or moments
- Stylistic flair that costs nothing
- Easy transition technique
How to Execute:
- Tripod with decent fluid head (or handheld)
- Start and end with static frames
- Very fast, smooth pan between
- Practice timing for smooth acceleration/deceleration
Used Effectively In: Baby Driver, Whiplash, music videos, high-energy narratives.
Technique 5: Working With Actors for Better Cinematography
Great cinematography isn’t just lighting and framing—it’s capturing authentic performance. Budget productions often neglect the cinematographer-actor relationship, but it’s crucial to visual storytelling.
Blocking for Camera and Performance Simultaneously
Blocking serves both performance (where actors move) and cinematography (how that movement appears in frame). Budget shoots often treat these separately, wasting time on set.
Integrated Blocking Process:
- Rehearse on Location: Before shoot day if possible
- Test Framing During Rehearsal: See what works visually
- Adjust for Both: Find blocking that serves story and image
- Mark Positions: Know exactly where actors will be
- Communicate Clearly: Actors understand how movement relates to camera
Time Savings: Integrated blocking eliminates back-and-forth between “what works for actors” and “what works for camera.” You solve both simultaneously.
Using Shallow Depth of Field Strategically
Budget filmmakers often use shallow depth of field (blurry backgrounds) excessively, thinking it looks “cinematic.” Strategic use is more effective:
When Shallow DOF Works:
- Isolating Subject: Removing distracting backgrounds
- Directing Attention: Ensuring viewer looks where intended
- Creating Depth: Separating foreground/background planes
- Romantic/Dreamy Mood: Soft, ethereal quality
When Deeper DOF Works Better:
- Environmental Context: Showing character in location
- Multiple Subjects: Keeping everyone in focus
- Wider Shots: Establishing setting
- Naturalistic Style: Less stylized, more realistic
Budget Consideration: Shallow DOF requires faster lenses (larger apertures), which cost more. But it’s achievable:
- 50mm f/1.8 lenses cost ₹8,000-15,000
- 35mm f/1.8 similarly affordable
- These provide beautiful shallow DOF on budget
Directing Eye Lines and Gaze
Where actors look dramatically impacts cinematography effectiveness:
Eye Line Techniques:
Direct Address (looking at camera):
- Creates intimacy and connection
- Breaks fourth wall
- Powerful for confessionals or direct storytelling
- Use sparingly for maximum impact
Off-Camera Focus:
- Actor looking just beside camera
- Creates contemplation and mystery
- More common than direct address
- Maintains some intimacy without full fourth-wall break
Looking Into Frame vs. Looking Out of Frame:
- Looking into empty frame space feels contemplative
- Looking out of frame creates tension (what are they seeing?)
- Strategic choice affects viewer psychology
Matching Eye Lines Between Shots:
- In conversation, eye lines must match between cuts
- If Character A looks screen right, Character B looks screen left
- Mismatched eye lines look amateur
- Plan carefully to avoid continuity issues
Capturing Subtle Performance
Budget shoots often rush performance, but capturing nuance creates better cinematography:
Techniques for Better Performance Cinematography:
- Multiple Takes: Even on tight schedule, do 3-4 takes minimum
- Vary Intensity: First take energetic, second subtle, third middle—gives editing options
- Hold on Reactions: Some of best cinematography is quiet facial expressions
- Trust Close-Ups: Simple, well-lit close-up on great performance = cinema
- Create Safety: Actors perform better when comfortable; make set supportive
Technique 6: Sound Drives Visual Perception—Never Neglect Audio
This seems like audio advice in a cinematography article, but here’s the truth: poor sound makes cinematography look worse. Viewers unconsciously associate audio quality with visual quality.
The Psychological Link Between Sound and Image Quality
Research shows viewers perceive visual quality as lower when audio quality is poor—even if the image is technically excellent. The reverse is also true: great sound elevates perception of image quality.
Why This Matters for Budget Cinematography:
- You could have Deakins-level cinematography, but bad audio makes it feel amateur
- Viewers tolerate slight visual imperfections with excellent audio
- Sound and image quality are psychologically linked
Budget Implication: A ₹10,000 microphone and ₹5,000 audio recorder have more impact on perceived production value than upgrading from ₹50,000 camera to ₹1,00,000 camera.
Minimum Audio Standards
Essential Budget Audio Kit (₹15,000-25,000 total):
- Shotgun Microphone (₹8,000-12,000):
- Rode VideoMic NTG or similar
- Directional pickup for dialogue
- Mounts on camera but preferable on boom pole
- Boom Pole (₹2,000-4,000):
- Even simple telescoping pole improves audio
- Gets mic closer to actors without being in frame
- Essential for quality dialogue recording
- Audio Recorder (₹5,000-10,000):
- Zoom H1n, H4n Pro, or Tascam DR-40
- Records separate high-quality audio
- Sync in post (clapper board or audio waveform matching)
- Lavalier Mics (Optional, ₹3,000-8,000):
- Small mics that clip to clothing
- Excellent backup for dialogue
- Rode Wireless GO II for wireless option
Why Separate Audio Recorder?: Camera-mounted mics are convenient but limited. Separate recorder:
- Better preamps (cleaner sound)
- More control over levels
- Redundancy (if camera audio fails, you have backup)
- Professional workflow
Sound Influences Cinematography Choices
Location Selection:
- Beautiful location with terrible sound (near highway, airport) vs.
- Adequate location with excellent sound (quiet, controlled)
- Sound quality should influence location decisions
Shot Selection:
- Wide shots allow boom mic in optimal position above frame
- Tight close-ups make boom positioning more difficult
- Plan coverage considering audio needs
Pacing Considerations:
- Dialogue scenes need clean audio, requiring more setup time
- Action scenes have more flexibility with sound design/ADR
- Budget your time accordingly
The 60/40 Rule
Conventional filmmaking wisdom suggests 80% of emotional impact comes from visuals, 20% from audio. Budget filmmaking flips this:
Budget Reality: 60% of perceived quality comes from audio, 40% from visuals.
Why? Because:
- Viewers tolerate visual imperfection more than audio problems
- Bad audio is immediately noticeable and off-putting
- Good audio makes acceptable visuals feel professional
- Audio requires less equipment investment for professional results
Strategic Implication: If budget forces a choice, invest in audio before upgrading camera.
Technique 7: The 180-Degree Rule and Spatial Continuity
Maintaining spatial continuity—ensuring viewers understand where subjects are in relation to each other—is critical to professional cinematography and costs nothing to execute.
Understanding the 180-Degree Rule
The Rule: Imagine a line connecting two subjects (or subject’s eye line). Keep camera on one side of this line for entire scene. Crossing the line disorients viewers.
Why It Matters:
- Maintains consistent screen direction
- Preserves spatial relationships
- Prevents viewer confusion
- Marks difference between amateur and professional
When to Break It:
- Intentional disorientation (psychological thriller, confusion)
- Establishing new spatial relationship (someone moves)
- Transition between scenes (crossing line signals scene change)
- 360-degree moving shot that explicitly shows environment
Budget Benefit: Costs nothing to implement, but failure to observe it makes even expensive cinematography look amateur.
Matching Action and Eye Lines
Match Cuts: Action started in one shot must continue coherently in next:
- Character reaching for object → cut to close-up of hand grasping it
- Character walking → cut to feet walking
- Character turning head → cut to what they’re seeing
Poor Match Cuts:
- Action jumps or repeats awkwardly
- Timing doesn’t flow naturally
- Spatial relationship unclear
Solution: Shoot overlap—let action complete slightly past cut point to give editing options.
Coverage Strategy for Budget Shoots
Professional productions shoot extensive coverage (many angles of same scene). Budget shoots can’t afford this time investment.
Efficient Coverage Strategy:
Essential Coverage:
- Master Shot: Wide establishing entire scene
- Medium Two-Shot: Main interaction in medium frame
- Close-Up Character A: Key emotional moments
- Close-Up Character B: Key emotional moments
Optional Coverage (if time permits): 5. Over-Shoulder Shots: Looking past one character to see other 6. Insert Shots: Important objects or actions 7. Reaction Shots: Listening faces during dialogue
Priority System: If time is extremely limited:
- Shoot master shot first (you can edit from this if needed)
- Get critical close-ups second
- Skip less essential coverage
Time Management: Don’t shoot coverage “just in case.” Every setup takes time. Shoot intentionally, not exhaustively.
Technique 8: Color Science and Grading for Cinematic Look
Professional color grading transforms adequate footage into cinematic images. Budget filmmakers often skip this step, losing significant production value.
Shooting for the Grade
Picture Profiles/Log Formats: Most cameras offer flat “log” profiles that preserve maximum dynamic range and color information for grading. Using these (S-Log, V-Log, C-Log, etc.) versus standard profiles is like shooting RAW vs. JPEG in photography.
Benefits:
- More latitude in post for adjusting exposure
- Better highlight and shadow detail
- Greater color grading flexibility
- More professional, filmic base image
Challenges:
- Looks flat and desaturated out of camera
- Requires color grading (can’t skip this step)
- Slightly harder to judge exposure on set
- File sizes may be larger
Budget Recommendation: If you can grade in post, absolutely use log profiles. If you can’t grade (no time, no software, no knowledge), use standard profiles with neutral settings rather than log.
Color Grading Workflow
Free Professional Tools: DaVinci Resolve is completely free (professional version exists, but free version is remarkably capable) and industry-standard for color grading.
Basic Grading Process:
Step 1: Balance (Technical Correction)
- Set proper white balance
- Adjust exposure
- Match shots in sequence
- Ensure nothing is clipped (pure white/black)
Step 2: Look (Creative Grading)
- Apply overall color treatment
- Push toward warm or cool
- Adjust contrast and saturation
- Create stylistic look
Step 3: Secondary (Selective Adjustments)
- Brighten/darken specific areas
- Adjust skin tones separately
- Enhance or suppress colors
- Add vignettes or glows
Time Investment: Budget 1-2 hours per minute of finished footage for professional grading. This isn’t optional—it’s difference between amateur and cinematic.
Common Cinematic Color Treatments
Teal and Orange:
- Warm (orange) skin tones
- Cool (teal) shadows and backgrounds
- Creates separation and depth
- Popular in action/thriller genres
Desaturated with Pops:
- Overall muted saturation
- Selective areas of intense color
- Creates focus and sophistication
- Common in prestige drama
High Contrast Vintage:
- Crushed blacks (no detail in darkest areas)
- Warm highlights
- Slight grain texture
- Nostalgic, film-like quality
Clean and Neutral:
- Balanced, natural colors
- Moderate contrast
- No stylization
- Documentary/realism aesthetic
Budget Tip: Study films you admire, screenshot frames, and use as reference when grading. Matching a specific reference is easier than grading abstractly.
The Power of Film Grain
Adding subtle grain texture (simulating film stock) dramatically increases perceived production value:
Why Grain Works:
- Covers digital artifacts and noise
- Creates texture and depth
- Signals “film” rather than “video”
- Unifies disparate shots
How to Add:
- DaVinci Resolve has built-in film grain effects
- Keep subtle (35mm film grain, not super-16 heavy grain)
- Apply after grading
- Render at full resolution
Budget Magic: Grain transforms clean digital footage into something that feels more expensive and filmic.
Technique 9: Production Design on Zero Budget—Dressing the Frame Without Money
Cinematography doesn’t exist in a vacuum—what’s in frame matters as much as how it’s captured. But production design costs money most budget filmmakers don’t have.
Subtractive Design: Remove Rather Than Add
The Principle: Professional production designers often spend more time removing elements than adding them. Budget filmmakers can do the same for free.
What to Remove Before Shooting:
- Modern brand logos and labels
- Clutter and random objects
- Bright, distracting colors
- Mismatched or ugly furniture
- Personal photos and specific decorations
- Anything that dates the scene unintentionally
Result: Cleaner, more timeless, more cinematic frames without spending anything.
Location as Production Design
Strategic Location Selection: The right location provides built-in production value that costs nothing beyond location fees (often free):
Valuable Location Characteristics:
- Texture: Interesting walls, surfaces, architectural detail
- Natural Light: Windows, skylights, ambient light quality
- Depth: Multiple rooms or visual planes
- Character: Distinctive features that communicate story
- Flexibility: Can be dressed or cleared easily
Free Locations:
- Your own home/apartment
- Friends’ and family’s homes
- Public spaces (with permission)
- Businesses during off-hours (ask nicely)
- Natural outdoor locations
- Abandoned buildings (with proper permission)
The Ask: Many location owners will provide access for free if:
- You’re respectful and professional
- You show them previous work
- You offer screen credit
- You’re flexible on timing
- You prove you have insurance (even basic)
Practical Set Dressing on Minimal Budget
When you need to add elements:
High-Impact, Low-Cost Items:
- String Lights (₹200-500): Instant atmosphere
- Candles (₹100-300): Warm, romantic lighting and design
- Plants (₹200-1,000): Add life and texture
- Fabric (₹300-1,000): Drape over furniture, hang as backgrounds
- Books (free if you own): Suggest intellectualism, stack for visual interest
- Vintage Items (₹200-1,000): Thrift stores, antique shops
The Goodwill/Thrift Store Strategy:
- Budget: ₹2,000-5,000
- Shop for: Lamps, decorative items, unique furniture pieces, vintage clothes, interesting props
- Return after shoot if items are undamaged (check store policy)
Borrowing:
- Friends and family are production design resources
- Return everything in perfect condition
- Offer credit in film
- Build library of borrowed items for future projects
Controlling What You Can’t Remove
Sometimes locations have unavoidable elements (ugly paint, bad furniture, distracting backgrounds). Control through cinematography:
Shallow Depth of Field:
- Blur distracting backgrounds
- Focus attention on subjects
- Minimize visible production design requirements
Tight Framing:
- Close-ups and medium shots show less environment
- Frame to exclude problematic elements
- Use edges of frame strategically
Strategic Lighting:
- Light subjects, let background fall dark
- Darkness hides production design limitations
- High-contrast lighting adds drama while concealing
Foreground Obstruction:
- Shoot through objects to partially obscure background
- Door frames, plants, fabric, etc.
- Creates depth while hiding problematic areas
Technique 10: Maximizing Limited Shoot Time—Workflow Efficiency
Budget productions are defined by time constraints as much as financial ones. Shooting efficiently without sacrificing quality separates successful projects from failed ones.
The Shot List Strategy
Pre-Production Shot Listing: Creating detailed shot list in pre-production (not improvising on set) is most important workflow optimization:
What Shot Lists Prevent:
- Forgetting essential coverage
- Shooting redundant angles
- Wasting time deciding on set
- Uncertainty causing crew/actor stress
- Missing the best light
What to Include:
- Scene/shot number
- Shot description (Medium two-shot, Close-up character, etc.)
- Lens/focal length
- Camera movement (static, pan, handheld, etc.)
- Lighting notes
- Estimated duration
Time Savings: 2 hours creating shot list saves 5+ hours on set figuring out what to shoot.
Shooting Out of Order Strategically
Budget filmmakers shooting in script order waste enormous time on lighting/setup changes.
Efficient Shooting Order:
Group by:
- Location: Shoot everything at Location A before moving to Location B
- Lighting Setup: All scenes with similar lighting together
- Time of Day: All golden hour scenes, all night scenes, etc.
- Actor Availability: If actor only available certain days, shoot all their scenes
- Camera Position: All shots from one camera position before moving
Example: Script has 5 scenes alternating between interior day and exterior night. Amateur shoots in order, moving constantly. Professional shoots:
- Day 1: All interior day scenes (various points in script)
- Day 2: All exterior night scenes (various points in script)
Result: Half the setups, double the efficiency.
The 90/10 Rule for Budget Shoots
Professional vs. Budget Time Allocation:
Professional Shoots:
- 50% time on lighting/setup
- 50% time on shooting
Budget Shoots (optimal):
- 10-20% time on lighting/setup
- 80-90% time on shooting
Why: You can’t afford extensive lighting on budget shoots. Accept this, plan accordingly, and maximize actual shooting time.
Strategies:
- Natural light eliminates setup time
- Practical lights are faster than rigging film lights
- Simpler lighting = more shooting time
- Pre-visualize to minimize decisions on set
The Emergency Shot List
Always have backup plan for time disasters:
Bare Minimum Coverage: If you’re running critically behind, what’s absolute essential coverage for scene to be usable?
Usually:
- Master shot (can edit entire scene from this if needed)
- Key close-up of protagonist at most important moment
That’s it. Everything else is luxury.
When to Execute Emergency Plan:
- Two hours behind schedule
- Losing light critically
- Location access ending sooner than expected
- Actor needs to leave early
- Equipment failure eating time
Don’t be precious. Get bare minimum and move on. Acceptable scene that exists beats perfect scene that doesn’t.
Technique 11: Learning from Every Frame—Continuous Improvement
The final technique isn’t on set—it’s developing your eye through deliberate study and practice.
The Screenshot Analysis Method
Daily Practice (15-30 minutes):
- Screenshot Films You Admire: Pause on striking frames
- Study Composition: How is frame arranged? Rule of thirds? Symmetry?
- Analyze Lighting: Where is light coming from? Hard or soft? Color?
- Identify Depth Cues: Foreground, middle, background elements?
- Note Camera Position: High, low, neutral? Why that choice?
- Consider Context: How does image serve story?
Write It Down: Don’t just look—articulate what you observe. Writing forces clear thinking.
Build Reference Library: Save screenshots organized by:
- Lighting type (natural, practical, dramatic)
- Shot type (wide, medium, close)
- Mood (romantic, tense, contemplative)
- Color treatment (warm, cool, desaturated)
Frame Comparison Practice
Exercise: Compare your frames to professional work:
- Shoot Test Frames: Create images with specific intent
- Find Professional Comparable: Screenshot similar composition/lighting from film
- Place Side-by-Side: What’s different?
- Identify Gaps: Where does your frame fall short?
- Determine Cause: Is it lighting? Composition? Color? Depth?
- Apply Learning: Reshoot incorporating insights
Reality Check: Your frames won’t match professionals initially. That’s fine. The goal is understanding why theirs work better, then gradually closing that gap.
The Pre-Visualization Habit
Before Every Shoot:
- Draw or Find Reference Images: Know what you’re aiming for
- Test Lighting If Possible: Scout at actual time you’ll shoot
- Mark Shot List with Visual Notes: Not just “medium shot” but “medium shot, shallow DOF, warm practical light from screen left”
- Share with Crew: Everyone knows the target
Why It Matters: Professionals rarely improvise—they execute pre-visualized plans. This is why they achieve consistent results.
The Cybertize Media Approach: Elevating Budget Cinematography
At Cybertize Media Productions Private Limited, we approach budget-conscious projects with the same cinematic rigor as high-budget productions—we just deploy different techniques.
Our Budget Cinematography Philosophy
Principle 1: Limitations Breed Creativity Budget constraints force innovative solutions that often produce more distinctive work than unlimited resources.
Principle 2: Technique Over Technology Mastery of fundamentals (lighting, composition, movement) outperforms expensive equipment operated by amateurs.
Principle 3: Plan Exhaustively, Shoot Efficiently Every minute on set with natural light or minimal crew is precious. Pre-production planning is our primary investment.
Principle 4: Embrace What Makes It Cinematic Natural light, darkness, negative space, practical lights, static frames—these aren’t compromises, they’re cinematic choices.
Our Services for Budget Productions
We offer multiple tiers of cinematography support:
Full Production Services:
- Complete cinematography for mini-series, short films, web series
- Location scouting and lighting design
- Camera operation and direction
- Color grading and post-production
Cinematography Consulting:
- Pre-production planning and shot listing
- Location lighting assessment
- Technical consultation on equipment choices
- Script breakdown for visual approach
Training Programs:
- Budget cinematography workshops
- One-on-one DP mentorship
- On-set training during your production
Rental + Operator:
- Professional camera packages
- Experienced operators
- Technical support
When to Work With Professionals
Even on budget productions, strategic professional involvement can elevate results:
Hire a DP When:
- Project has long shelf life (feature film, series pilot)
- Cinematography is central to the story
- Shooting schedule is compressed
- You need consistent professional look
- Stakeholders expect certain quality level
DIY When:
- Pure content/concept test
- Experimental or intentionally raw aesthetic
- Budget truly prohibitive (₹25,000 or less total)
- Learning experience is primary goal
- You have genuine cinematography skill yourself
Conclusion: Cinematic Quality Is a Choice, Not a Budget
The democratization of filmmaking technology has created unprecedented opportunity: truly cinematic imagery is accessible regardless of financial resources.
But accessibility doesn’t guarantee results. The gap between amateur and professional isn’t equipment—it’s expertise. It’s understanding which techniques deliver maximum impact within constrained resources. It’s knowing that darkness can be more cinematic than perfect lighting, that negative space creates more sophistication than elaborate production design, that one well-chosen practical light outperforms ten poorly placed film lights.
The techniques in this guide—natural light mastery, composition as production value, strategic use of practicals, efficient workflow, deliberate study—represent the distilled wisdom of successful budget cinematography. They’re not shortcuts or compromises; they’re professional strategies that work within reality rather than fighting it.
Your budget may be ₹50,000 or ₹5,00,000. Your crew may be three people or ten. Your timeline may be five days or five weeks. None of these factors determine whether your mini-series or short film achieves cinematic quality. That determination comes from understanding how to deploy these techniques strategically, planning obsessively, and executing with precision.
The question isn’t whether you can create cinematic work on a budget. The question is whether you will master the techniques that make it possible.
Ready to create your budget mini-series or short film with professional cinematographic expertise? Contact Cybertize Media Productions Private Limited to discuss how we can help you achieve cinematic results regardless of budget constraints.
About Cybertize Media Productions Private Limited
Cybertize Media Productions Private Limited is a leading production house serving filmmakers and content creators across India with comprehensive cinematography services that deliver cinematic quality regardless of budget constraints.
Our cinematography expertise spans:
Full-Service Production:
- Mini-series and web series cinematography
- Short film production
- Feature film services
- Documentary cinematography
- Commercial and corporate video
Budget-Focused Services:
- Cinematography consultation and planning
- Location scouting and lighting design
- Equipment rental with professional operation
- Post-production and color grading
- Training and workshops for independent filmmakers
Specialized Capabilities:
- Natural light cinematography
- Run-and-gun documentary style
- Multi-camera setups
- Drone cinematography
- Time-lapse and specialized techniques
We believe that cinematic storytelling should be accessible to filmmakers at every budget level. Whether you’re shooting your first short film with ₹50,000 or producing a mini-series with ₹10 lakhs, we provide the cinematographic expertise and strategic guidance to maximize visual impact within your resources.
Contact Cybertize Media Productions to discuss your project and discover how professional cinematography expertise can transform your budget production into cinematic reality.